GCEの環境整備を進めています。今回は、ドメインの設定とLet’s Encryptを利用した無料httpsの設定です。
GCEにドメインを与える
まず、Let’s Encrypt は、発行しようとしている証明書のドメインの80番ポートにアクセスし、特定の内容のファイルが存在していることを確認することで、ドメインの所有者が発行要求を出していることを確認しているので、ドメインを設定します。
お名前.comでDNSレコードの設定
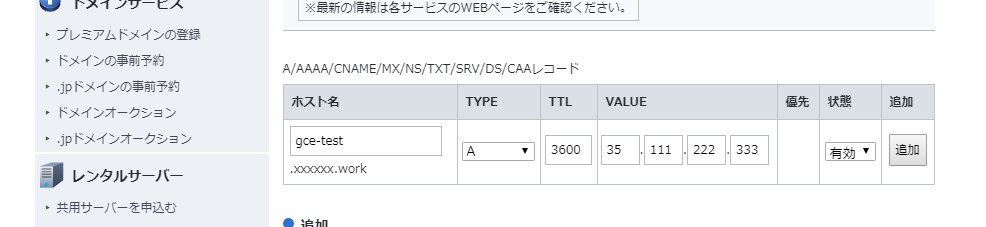
遊ぶ用のドメインなので今回はサブドメイン使います。
5分ぐらいで浸透したようで、ドメインを使って、GCEのApacheで立ててるサイトを表示できました。
CertbotというツールでLet’s Encryptを設定します
手順通りにコマンドを入力していくだけです。
インストール
$ sudo yum install python2-certbot-apache
対話型で設定していく
apacheの設定ファイルから自動でVirtualHostsを取得してくれて、メールアドレスを入力して、あとはそれぞれ選択していくだけで設定完了となります。
$ sudo certbot --apache
Saving debug log to /var/log/letsencrypt/letsencrypt.log
Plugins selected: Authenticator apache, Installer apache
Enter email address (used for urgent renewal and security notices) (Enter 'c' to
cancel):
更新が近づいてきたときなどに通知するメールアドレスを入力
Starting new HTTPS connection (1): acme-v01.api.letsencrypt.org

-------------------------------------------------------------------------------
Please read the Terms of Service at
https://letsencrypt.org/documents/LE-SA-v1.2-November-15-2017.pdf. You must
agree in order to register with the ACME server at
https://acme-v01.api.letsencrypt.org/directory
-------------------------------------------------------------------------------
(A)gree/(C)ancel:
規約の同意 A
-------------------------------------------------------------------------------
Would you be willing to share your email address with the Electronic Frontier
Foundation, a founding partner of the Let's Encrypt project and the non-profit
organization that develops Certbot? We'd like to send you email about our work
encrypting the web, EFF news, campaigns, and ways to support digital freedom.
-------------------------------------------------------------------------------
(Y)es/(N)o:
Electronic Frontier Foundationへのメールアドレスの共有 Nでいいっぽい
Starting new HTTPS connection (1): supporters.eff.org

Which names would you like to activate HTTPS for?
-------------------------------------------------------------------------------
1: gcp-test.xxxxxx.work
-------------------------------------------------------------------------------
Select the appropriate numbers separated by commas and/or spaces, or leave input
blank to select all options shown (Enter 'c' to cancel): 1
どのホストに設定するか選択 1
Obtaining a new certificate
Performing the following challenges:
http-01 challenge for gcp-test.xxxxxx.work
Waiting for verification...
Cleaning up challenges
Created an SSL vhost at /etc/httpd/conf/httpd-le-ssl.conf
Deploying Certificate to VirtualHost /etc/httpd/conf/httpd-le-ssl.conf
Enabling site /etc/httpd/conf/httpd-le-ssl.conf by adding Include to root configuration
Please choose whether or not to redirect HTTP traffic to HTTPS, removing HTTP access.
-------------------------------------------------------------------------------
1: No redirect - Make no further changes to the webserver configuration.
2: Redirect - Make all requests redirect to secure HTTPS access. Choose this for
new sites, or if you're confident your site works on HTTPS. You can undo this
change by editing your web server's configuration.
-------------------------------------------------------------------------------
Select the appropriate number [1-2] then [enter] (press 'c' to cancel): 2
httpへのアクセスをhttpsにリダイレクトするかどうか 2(リダイレクトさせる)
Redirecting vhost in /etc/httpd/conf/httpd.conf to ssl vhost in /etc/httpd/conf/httpd-le-ssl.conf
-------------------------------------------------------------------------------
Congratulations! You have successfully enabled gcp-test.xxxxxx.work
You should test your configuration at:
https://www.ssllabs.com/ssltest/analyze.html?d=gcp-test.xxxxxx.work
-------------------------------------------------------------------------------
IMPORTANT NOTES:
 - Congratulations! Your certificate and chain have been saved at:
   /etc/letsencrypt/live/gcp-test.xxxxxx.work/fullchain.pem
   Your key file has been saved at:
   /etc/letsencrypt/live/gcp-test.xxxxxx.work/privkey.pem
   Your cert will expire on 2018-10-17. To obtain a new or tweaked
   version of this certificate in the future, simply run certbot again
   with the "certonly" option. To non-interactively renew *all* of
   your certificates, run "certbot renew"
 - Your account credentials have been saved in your Certbot
   configuration directory at /etc/letsencrypt. You should make a
   secure backup of this folder now. This configuration directory will
   also contain certificates and private keys obtained by Certbot so
   making regular backups of this folder is ideal.
 - If you like Certbot, please consider supporting our work by:
   Donating to ISRG / Let's Encrypt:   https://letsencrypt.org/donate
   Donating to EFF:                    https://eff.org/donate-le
「設定はこの設定ファイルに記述しました。
ドメイン開いてみて確認してみて!
証明書はここに置いたよ、期限は2018-10-17までだよ」
ってことが表示されて完了です。
httpsでの表示確認
とりあえず、さっきドメインのDNS浸透待ちのときブラウザで開いてた普通のhttpのアドレスでそのまま更新してみる。
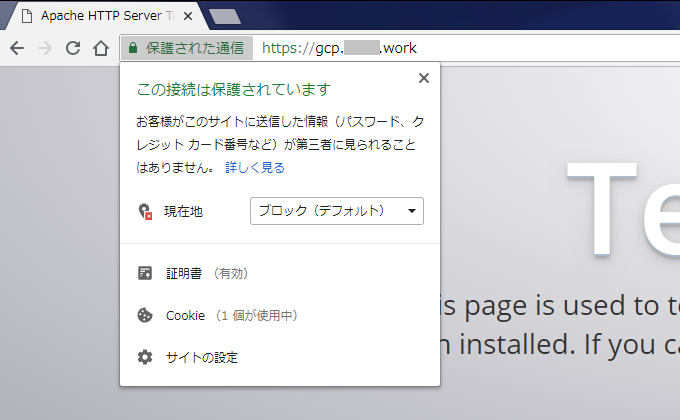
ちゃんとhttpsにリダイレクトされて表示されました。設定完了の直後ですが、すぐに使えています。
想像よりも簡単で驚きました。ブログに書き残しながらやっても20分ぐらいです。
